Sunday 17 July 2011

Hiatus over

Wow!  It has really been a while since I have done any work on the project and posted any updates on the blog. What initially started as a short few days break to enjoy the hot spell we had a couple months ago, evolved into a full wargame  hiatus, but I must say that I feel much refreshed after taking a bit of a break from doing all the painting and scenics. 

Anyway this week I finally resumed work on the project, and eased in by finishing some foundry Zulus that have been sitting on the painting table for the last few months. The one area that I was evidently short of for the rorkes drift game was Zulu’s with firearms. Hopefully this small lot will help to readdress that shortfall.


Also some of you may have also noticed that the general service wagons were painted in the wrong colour, this has been niggling  me for some time so finally I got round to correcting this error.


Well thats it for now and  hopefully I will not leave it so long before my next update.


Terry

Sunday 1 May 2011

doing a bit of work in the garden

Well I knew it  had been some time since my last update but I have only just realised quite how long, I seem to have missed out april entirely. So what is my excuse ... well actually I was just being rather lazy and enjoying the lovely weather we have had  during most of april.
I have not entirely ignored the project, in fact the hot weather was the perfect excuse to get out in the garden and make one of those scenic pieces that are a  a bit to messy to make in the house, well it beats mowing the lawn. So what was this piece of scenic? Ummmm how to describe it ... well maybe a few pictures will do the job for me.

some rough ground maybe?


Ok it was actully a large hill or is a mountain? that I plan to use as the hill behind the drift and also as a backdrop to the Battle of Isandlwana. 

 
Redoubt zulus on the hill


anyone bring along a ladder?

Well thats it for now ... I'm off  out into the garden to do a bit of sun worship.

all the best Terry


Monday 21 March 2011

Rorkes Drift Hospital part one

Sorry for the lack of posts in the last week but after completing the storehouse I took a short rest for a few days so as I'm able to make a start on the hospital afresh. That does not mean I have not been doing any work on the project, just that it has mainly been behind the scenes work IE research and preparation. Firstly I have to cast up a load more Linka pieces for the cladding of the foamecore walls as the storehouse, cookhouse and test piece depleted my stock pile to zero. The new linka plaster casts will also require a few days to fully dry out before using them and as I'm only able to cast up 12 pieces at a time I'm doing a bit of casting each day and popping them aside to dry so it will be a few more days till I have enough pieces done and they are ready to be used.

While I have been doing this I have also been doing a bit of research on the hospital, Its size its layout, the number of patients, the positions of the defenders, loopholes, evacuation route etc.

While I have been able to find a few diagrams of the hospital layout most of which differ on a few points they do on the whole agree on the major features, I have only been able to find the one description which gives any details although sparse about the actual size of the hospital.

Here is that description By Chaplain Smith.

“ A pretty farm was situated on an elevated rock terrace, about three quarters of a mile way from the ford. The buildings were erected by an old frontier agent called Rorke, together with the farm, which had recently been purchased by reverend Otto Witt, a man of Swedish church, aiming to establish a mission for the Zulu.
The hill situated at the rear was called Oskaberg, in honour of the Swedish King.

The house was situated within several feet of the edge of the rocky terrace, with two or three acre garden planted with ordinary grape vines and many oranges, apricots, apple, peach, quince, fig and other fruit trees. A path ran parallel to the front of the house, between the garden and the terrace, with a strong stone wall along the side terrace. The land sloped between the path and the terrace, occupied by an orchard of cape poplars, some large cork trees and various kinds of large shrubs.

The site of the house as described was 80 feet long and the left rear side wall was almost 60 feet long. The other block of buildings, including a stable was located forty paces to the left, with a 80 foot side parallel to the outer wall of the end of the main building. These buildings measuring 52 feet enlarged the house at the rear. Almost parallel to the end of the left wall of this block of buildings, with an area of ten or twelve feet, a stone wall extended to the edge of the rock shelf, forming the right wall of a kraal of some 50 feet, which was divided in half by another similar parallel wall.”


So using the above description and the space needed for each of the pallets*   in each of the rooms as a guide I have had the first go at drawing a rough plan. The plan is being revised as I find other information in my books, one revision since drawing up the plan are the loopholes. D Morris in " the washing of the spears" states that in the middle room on the side that three bricks were removed for loopholes and that there were three defenders in this room, John Williams Joseph Williams and the patient W Horrigan who was well enough to stand and help with the defence of the room, this in my mind equates to three loopholes rather than one big loophole. the same applies to the corner room that Hook defended It seems that at least two loop holes were made in this room one on the side wall and another on the back wall, also that Thomas Cole being claustrophopic left the defence of this room and the connecting room to Hook and went to help build the meelie bag wall, so there should only be one patient and one defender in this room

* A pallet being  a simple ticking bag that was filled with  straw, grass or other field fillings to make a  mattress

Below are the initial plans for the building that will be revised and used as a guide for the making of the actual Build Plan

 Initial plan a WIP 


for the basic layout of the rooms I used the picture below,  a plan by Lt Chard in september of 1879


As you can see its still WIP so if you see any obvious omisions or have any info that may be of help please leave a comment

thanks for reading 
Terry

Sunday 13 March 2011

Logistics


With any military expedition there is the problem of logistics. How to keep your force supplied with all that it needs to fight, during the Zulu war this required vast numbers of wagons,carts,mules, and native bearers to transport everything that the Army would need during the campaign, supplies  such as ammunition, food, tents, and even the field  forge for replacing the cavalry horses shoes.

While I have already made the wagons that will be used as part of the defences in the rorke’s drift game I will also need a few more wagons for playing any of the three columns of the Invasion force.

“By January 1879 there had been collected 977 wagons, 56 carts,10,023 Oxen,803 horses and 398 mules with 2000 extra natives to drive and manage them.”
Michael barthrorp the zulu war a pictorial history.

As you can see from the figures above wagons, carts, and oxen  will  be required in good amount to play many of the actual  battles or fictional encounters, to this end I plan to make a few wagons and carts both limbered with oxen or mules for the wagon train on the move and unlimbered  for use in the camp or as a Laager.

While I still need to make a few more Colonial  Ox wagons, Colonial mule wagons, Carts and general service wagons I have made a small start on the wagon train.
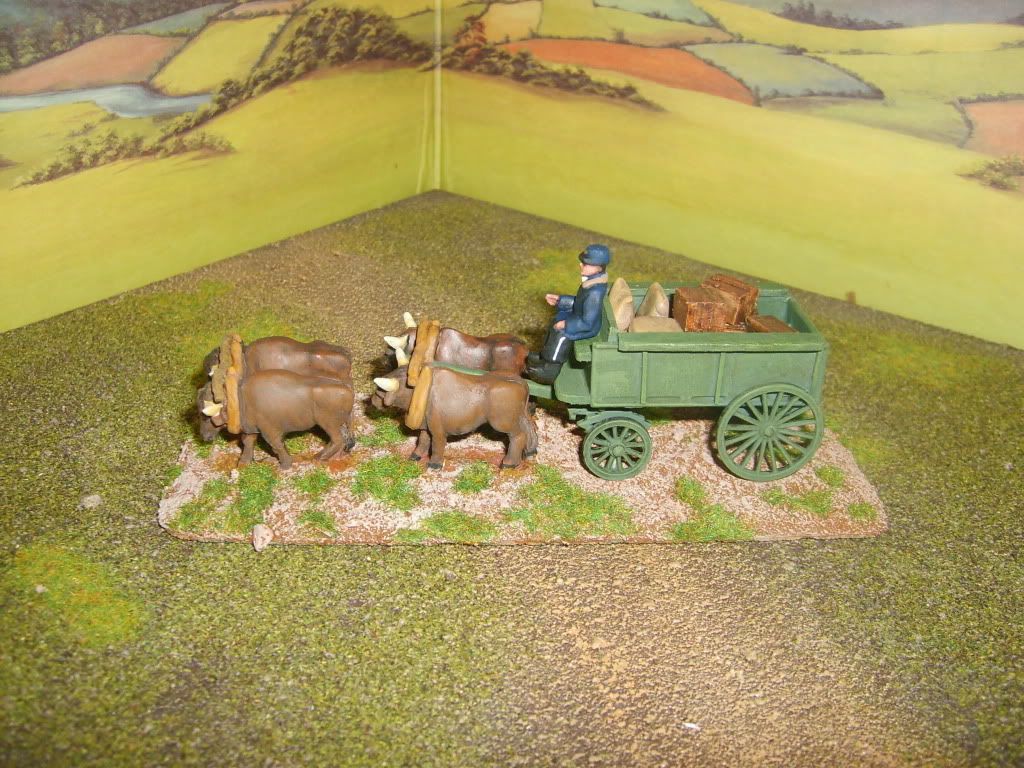

 two finished wagons

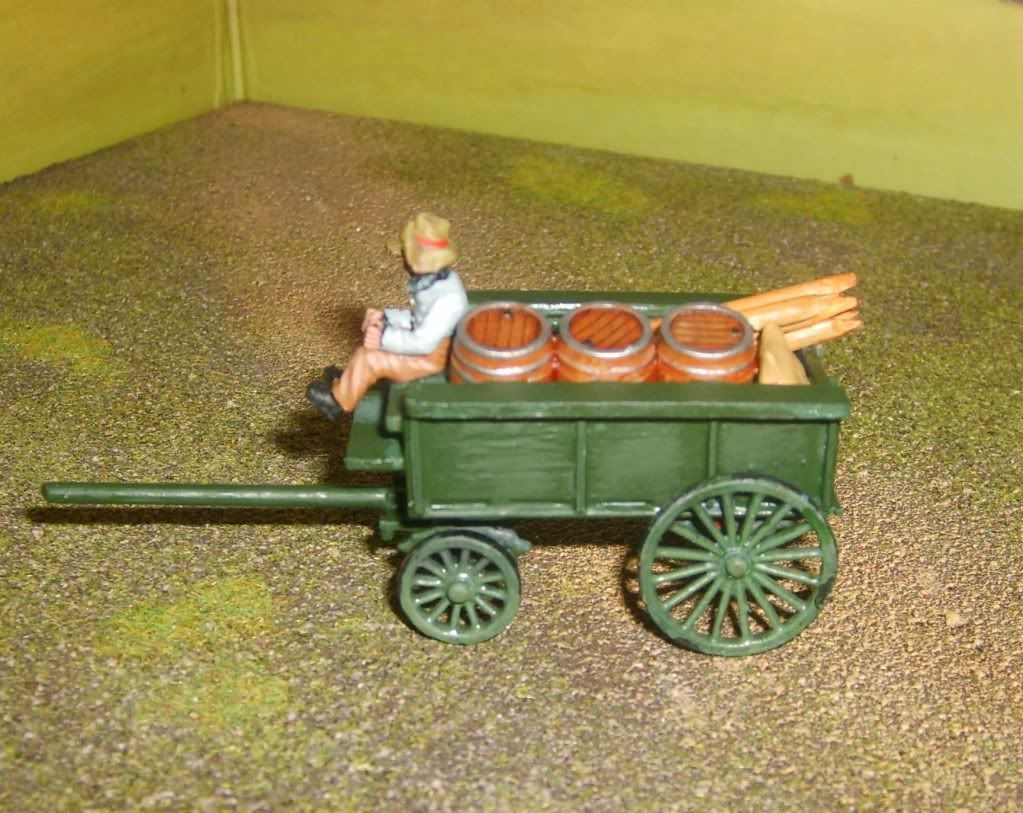
the first two general service wagons both lledo conversions,I have a sneaky suspicion that I have the colour scheme wrong and they should be blue gray.
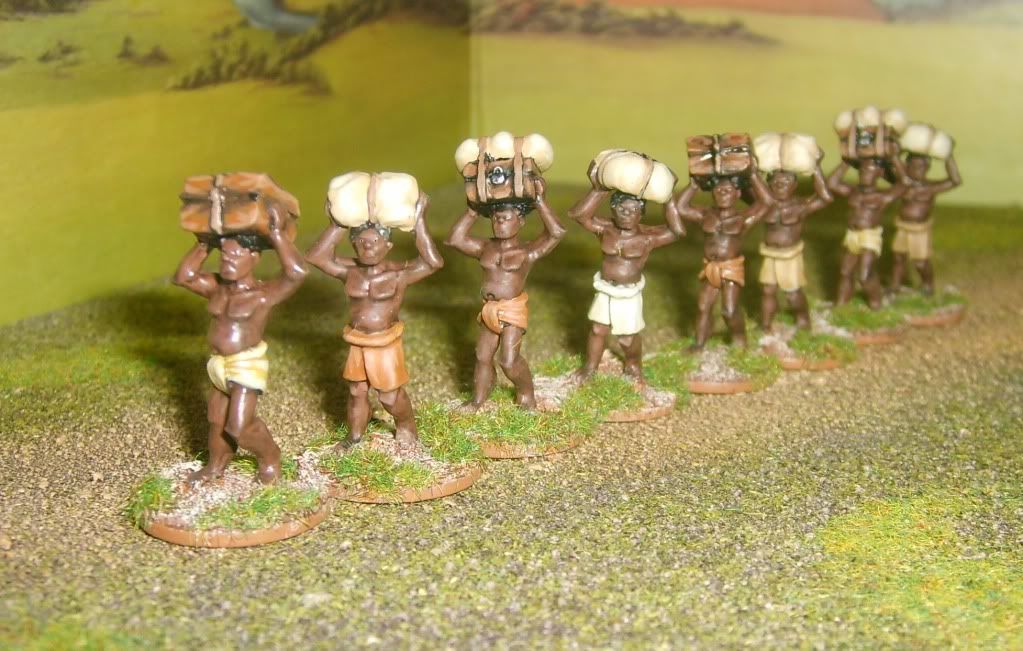
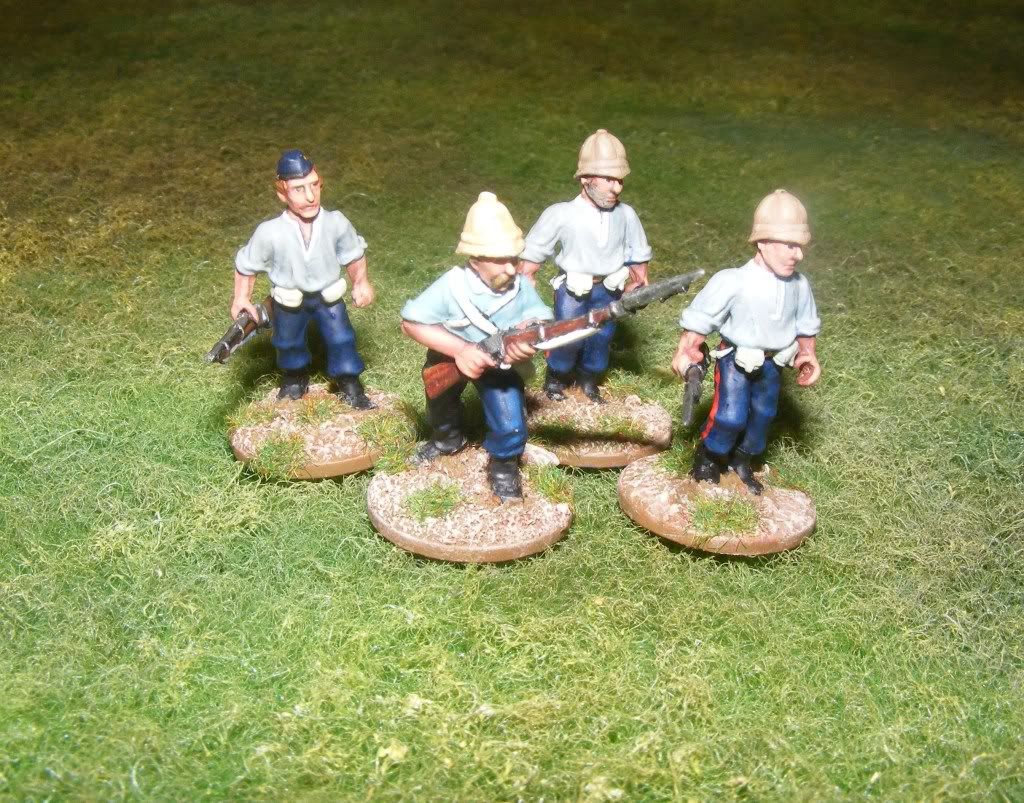
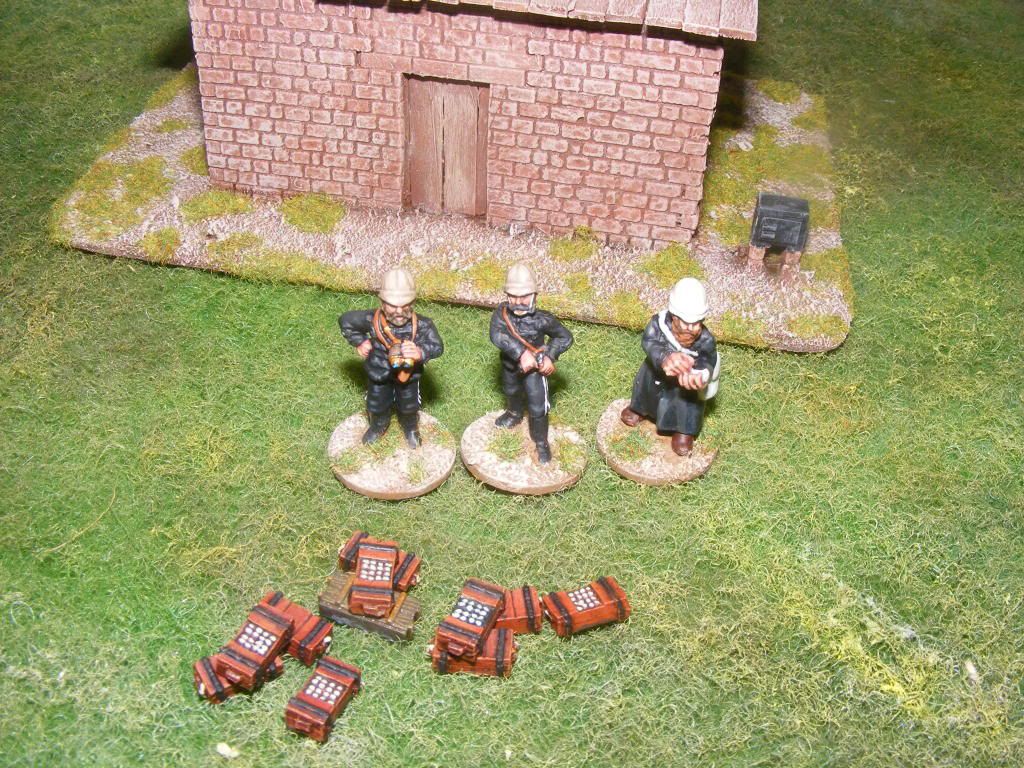

Native Bearers
The first lot of native bearers,while taking the photo's I noticed that a few of them will require another coat of matt varnish. This first lot of bearers are from the Dixon Dahomy range I plan to add a pack or two of the  foundry bearers to them.
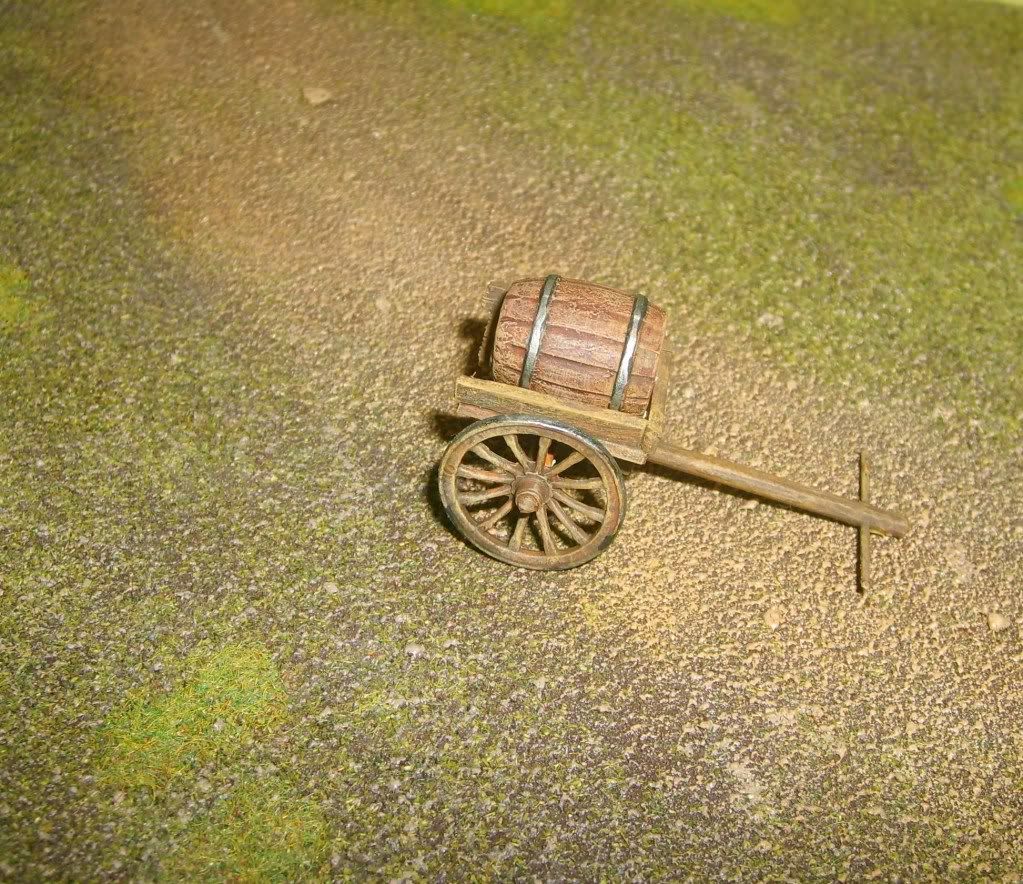
water wagon 

The unlimbered water wagon made for the rorke's drift game but i'm sure it will come in very useful in other games as part of the camp equipment. I will be copying this and making a limbered version sometime in the future.

 another Lledo conversion
Another lledo wagon which is almost finished just awaiting the base and some oxen or mules.
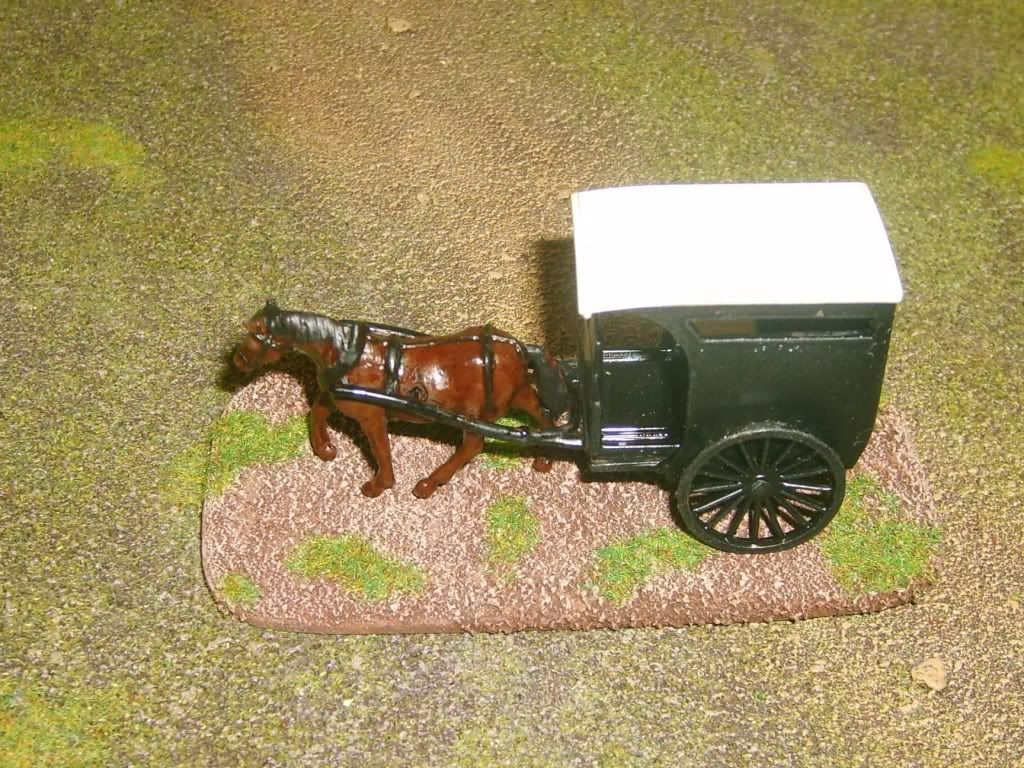
 
A Lledo carriage

While not part of the wagon train I have also aquired another lledo carriage.This carrage has only recieved a basic paint job at  the present time and still requires a bit of work, Im planning on using it for the hollywood "zulu" game when it will be used as the Rev Witt's carriage.

 As you can see its a small start but there is still so much to left to do but for now work has had to stop until I get some more Oxen, mules, and Wheels
Terry 


Wednesday 9 March 2011

TSATF Zulu markers

One problem that I found while playing TSATF with ten plus Zulu units on the table, was keeping track of which units had already moved in any one turn. We soon solved this small problem by using the  foam counters we use to mark moved units in Disposable heroes, but while they do the job very well they don’t really look the part so for purely cosmetic purposes I have made a few movement counters for the Zulu units.

Of course while thinking of what to use to make the markers I soon thought of other uses for which the use of a marker would be beneficial. One Idea was to put the markers to use as the markers for blinds.
During the Nightime sequence of the Rorke's drift game I plan on putting them to use to record the presence of the Zulus on the board but not within visible distance. So the British player will have to be careful or a possible Zulu attack on one wall could just turn out to be a few skirmishers causing a diversion.

Another idea I had was to paint up the shields in the different main colour schemes of the different Zulu regiments involved in the defence of the 1879 invasion. While it helps with unit recognition by 1879 most of the amaButhos contained mixed shield colours. This gives us another use for the markers, I can if needs arise  mix up and use the Zulus I already have done to represent a different iButho and differentiate the different amaButho's simply by using the correct colour shield for the  iButho I wish to  depict in front of the mixed unit  as a  unit recognition marker.


The sixteen markers in their movement trays which  I keep them in when not in use. Movement trays with a single shield placed with its back facing the opponent is  used as a blind representing the possible  position of zulu's  during a game.


the above picture is a still from the film Zulu. Lt Chard played by Sir Stanley Baker about to stick a Zulu shield in the ground the insperation for the design of the zulu markers.


I have started to collect the pieces needed for the different  British markers but they are still someway down the list of pieces to be made for the games.

Terry

Sunday 6 March 2011

the finished storehouse

Just finished applying a bit of paint to the doors and shutters, so apart from a bit of tinkering I.E applying the odd Highlight to the painting and a final coat of Mat varnish I think It is completed.

front view
I have used some artistic licence with regard to some features that I could not find out details about but overall I’m quite happy with the finished piece
.

The Veranda

rear view


The external Staircase

the small roof section removed
 
The roof sections are removable to allow for figures to be positioned inside the building, the single story section of the roof is separate from the larger double story section. This has turned out quite by accident to be a fortunate bonus, as this is the only real weak point in the store house, the one ground floor door that was outside of the meelie bag wall, So should the Zulus break in via this door the Zulu player will not know what is in the other rooms until he enters them.

To assist in this I have also made a couple of second story floorboard pieces that will be put to use as the floor of the small upper storeroom and also to conceal the occupants of the lower  rooms until they move or the Zulus enter the room. 

 one of the fllorboard pieces in place


Now to start work on the floor plans for the Hospital

Teery

Friday 4 March 2011

W.I.P the Storehouse update 3

Firstly sorry for the longer than normal delay in posting an update, but I felt it better to wait until I had more to report.

Well the  roof sections have been made and I have thatched the larger main section of the roof , just the smaller section left to thatch.


As you can see in the picture I have departed from the norm and I have gone for a dark, aged  colour  for the roof, which I think is in more keeping for Thatch that would have been approximately  thirty five years old at the time of the battle. I may well end up drybrushing in some highlights but I will wait until I have finished the whole building until I decide if it needs it.

The ground has been completed and is awaiting a few tufts of static grass,and as you can see I have made the external staircase. This still of course requires a bit of painting.

This evening I am working on the second section of roof that requires thatching and tomorrow I can hopefully make a start on all the doors, windows and shutters.

Terry

Sunday 27 February 2011

W.I.P the Storehouse update 2


A very quick update tonight 

Over the last couple of days I have manage to finish all the clading and  I have given it a  couple of coats of paint.
Still need to give it a proper paint job , but first there are the doors and windows to finish plus the staircase on the side. Then work can start on the thatch roof

Terry

Saturday 26 February 2011

W.I.P the Storehouse update 1

Yesterday I Managed to spend a good bit of the day in the work room working on the storehouse, I started cladding the foamcore with linka only to run out of the pieces I needed.
I calculated that I had enough pieces cast to clad the storehouse, but I forgot to take into account the pieces I had used on the cookhouse and the experimental piece. So I had to switch to casting new pieces of linka.
 In between casting more linka pieces I.E while waiting to de mould newly cast pieces.  I managed to do the floorboards. As this was originally a storeroom before the Rev Witt turned it into a meeting room, I have made the floorboards a little rough as I imagine floorboards would be in a  provincial storeroom of the period.
Even though I had to stop to cast a load of new linka pieces I still managed to clad about 70% of the storehouse. Unfortunately though I will now have to wait a full day for the new pieces to dry enough for me to be able to use them.
After the cladding is finished I will then go around the building filling all the gaps where the linka pieces have not  butted up to one another fully, and then finish off the rest of the windows and doors.
 After that there is the outside staircase to be made and then of course I have the roof to make a start on.

The  Progress so far
just both sides of  the right side end wall 
and inner walls of the open storage area left to clad,


arial view. 

The amount of  floor space is beter seen from the  arial view, The proportions of the floorspace are larger than the real building. I have done this to allow for the larger bases that the figures have. This way two or more figures can be in the one room without there bases touching, important for close combat with some rules.

Hopefully the building will not look to large on the table
 
Terry

Thursday 24 February 2011

W.I.P the Storehouse

 I have not been able to spend much time on the project so far this week, but this evening I did pop into the workroom and made a start on the first of the main buildings for the Rorkes drift game.


Just the basic foamcore structure so far, I borrowed some silicone glue substitute  from my parents who make cards, and who recommend this glue for card craft as this was the ideal situation to give it a try on foamcore and see how it performed.
The glue is called Pin flair glue gel and it seems to be doing a good job. I have put it aside overnight to dry fully but the structure seamed quite solid after an hour when I went back to check that nothing had slipped out of place.
Tomorrow I will start the slow and painstaking part of the build, the cladding of the foamcore with the Linka sections; this may take a few days to do.

I will post an update in a few days

UPDATE 25th Feb : As I had to edit the post to insert the name of the glue I will take the opportunity to post a quick  update.  The glue has fully dried now and the bond is very good indeed I have removed all the pins that I used to hold it all in place while the glue dried, and there is no movement or loose joints. I will definitely look at buying a tube of this glue to see if it has other applications within  model making.
Terry

Tuesday 22 February 2011

Collapsed Bell Tents for the Rorke's Drift game.


Collapsed Bell Tents , originally uploaded by MrTeld.

To complement the Rendra tents I posted a few weeks ago http://zuluwarminiature.blogspot.com/2011/02/renedra-bell-tents.html
I have  made four collapsed bell tents to be used in place of the four rendra tents for marking the position of the abandoned camp at Rorke,s Drift.
The tents will initially be used in the Hollywood version of the game as if memory serves me right the tents were just collapsed in the film.
With regard to the historical battle I am still trying to determine if the camp was fully struck or if the bell tents were just collapsed before starting work on the more vital barricades. Initially the plan was to strike the camp in preparation of abandoning the drift;

I received a message from Lieutenant Bromhead, commanding the Company 24th Regiment at the Camp near the Commissariat Stores, asking me to come up at once.
I gave the order to inspan, strike tents, put all stores, &c., into the wagon, and at once rode up to the Commissariat Store and found that a note had been received from the 3rd Column to state that the enemy were advancing in force against our post, which we were to strengthen and hold at all costs.

John. R. M. Chard,
Lieut R.E.

Given time it would have taken to ride up to the Store and back I am inclined to side towards the collapsing of the tents only.In time I plan to use them as markers in other Zulu war or Sudan games to replace the camp tents should the camp be over run. To that end I’m sure in time they will be of use in a Isandlwana game in the future

When I finally get around to buying another four of the rendra tents think I shall make another four of the collapsed bell tents to go with them.
Terry

Friday 18 February 2011

Garden Walls, Meelie Bag defences, and Kraal’s


Garden Walls, Meelie Bag defences, and Kraal’s

Progress with the scenic’s required for the Rorkes drift are progressing at a steady pace the larger part of the time seems to be taken up with research to try and be as accurate as I can be given the limitations of gaming and limited modelling  abilities.  I started with the plan of doing all the smaller stuff first so as I have something finished and to spur me on with the project. To that end most of the smaller stuff is now finished although I am thinking at this time of re modelling the meelie bag walls as the ends of the casts just don’t fit together right without sanding down the edges.

Anyways on with the progress report.


One of the first things that you know you are going to need lots of for Rorke’s drift are Meelie bags. There are a few suppliers that you can get them from, But as usual I decided to make them myself , partly to maybe save a bit of money , but mainly because I like to build the scenic’s myself when ever I can. 

 Sculpy Meelie bags

The first test pieces were made out of Sculpy and came out really nice, but it was obvious that for the amount of meelie barricades needed making each piece by hand with sculpy was impractical as well as very expensive. So the next piece of meelie bag wall I made I used as a master for a latex mould.

 Sculpy Master and Mould


I used hurculite plaster for the meelie bags and so far I’ve had no breakages. The only problem is that I forgot to ensure that the edges were square. They are not and so I have to square off each piece I cast. I’m now considering making a new master and mould.

 Cast meelie bag walls

The Garden walls and walls for the Kraal were again made from a master and cast in plaster. The master for the walls did not fare as well as the sculpy meelie bag wall master.
It was a piece of wood with gravel pieces glued on with contact adhesive.

 Garden Wall Castings

 A lot of the gravel came away while de moulding the master. But I at least have a good mould, and this one at least has square edges thanks to the piece of wood.

Stone Kraal

 
The rough stone Kraal was made by simply super gluing large decretive stone gravel pieces to the base board and painting. 

 Rough stone kraal


So next up is to remodel the meelie bag wall and cast them, make up the biscuit box wall , again I made a master for this and tried casting them but I did not check the undercut between the boxes and the mould is unusable, So I will just scratch build them, and to make a start on building the hospital and storehouse.

All for now Terry


Wednesday 16 February 2011

Cookhouse ,Latrine and Privy

I couple of months a go I made a couple of the small buildings in the rorkes drift compound. They were made initially as a small scale experiment to ascertain the suitability of some of the materials and assembly techniques to use on the main buildings.

The first building I made was the cookhouse this was made from hurculite plaster with Linka moulds and is a sealed unit. This building came out alright and will properly make it onto the table for the game. I really like linka for buildings as after purchasing the moulds the wall pieces are relatively cheap to make and being made of plaster are easy to cut, sand down etc.


  It was clear while making this building that linka on its own would not be strong enough for the large buildings, or for that matter small building with removable roofs for placing figures into. So after a bit of thinking another building was attempted to deal with the problems highlighted with the first building, the second experiment involved foamcore walls with linka cladding.


This building has been left with out flooring or roof for some time just to see how the walls themselves stand up to wear and tear and after a few months of kicking around the outhouse / workroom and then being given to my son for his Fallout game the result is in, The build is strong enough for the building of the storehouse and Hospital.

Another small building that was attempted to try out the teddy bear fur ”Thatch" technique was a latrine. My thinking was that the drift being a staging post for the column plus it being used prier to the columns arrival as a Church there was a good chance that a latrine may have been built.


But it seems I was wrong, although I have not found any accounts as to the size and build of the WC at the drift most plans and diagrams show a small privy, so yesterday I made a Privy

.

So with all the small buildings having been made I can now start work on the main buildings.
 all for now Terry


P.S
The plan for the next post is the making of the Meelie bag wall, the garden wall and the small and large kraal,s

Rorkes Drift Wagons


zulu war wagons, originally uploaded by MrTeld.


I finely finished varnishing the wagons for the Rorke, s Drift game this morning, the green looks a little bright in the pictures due to the flash on the camera, the colour looks much better in natural light, but you will just have to take my word for that.

I went with the traditional Boer red and green colour scheme for the Boer wagons. For the general service wagon I went with vallajo military green. Having only found pictures of  general service wagons in this ww1 Green colour scheme and having found no data in my books  as to the colour of the British army livery during this period I went with what I could find.

Some of the pictures of  the Boer and general sevice wagons that I used for colour reference can be found at the following links :

 Boer Wagon
http://skilder.arkpark.info/album.htm
http://www.dreamstime.com/stock-photo-boer-wagon-in-kruger-park-image9794330

 General Service Wagon


Sunday 13 February 2011

General Service Wagon Mk1 Royal Engineers


General Service Wagon Mk1 Royal Engineers, originally uploaded by MrTeld.

Lt Chard Posing next to his new General Service wagon,  
Today I have managed to finish the construction of the last of the wagons for the Rorkes Drift game,all three still require painting but I feel quite pleased as this is another thing I can tick off the list of scenic requirments for the scenario.
I plan on using this one  in the Rorkes Drift game for the abandoned Royal Engineers wagon that was left outside the defensive perimeter on the other side of the rough stone Kraal.
As to the question of authenticity, well I have no idea if the Wagon General Service mk 1 R.E  was used by Engineers in 1879  but it just made a nice touch.
Line drawings for a lot of victorian Artillery and Engineer transport can be found at the following link :

http://www.palmerstonforts.org.uk/art/wagons.htm

Saturday 12 February 2011

Boer Ox Wagon number two


Boer Ox Wagon , originally uploaded by MrTeld.


I managed to make another ox wagon yesterday, just got to look at what colour to paint it now. This one is of a slightly different design to the first one. I think I will just paint it and leave it without any oxen so it could be used for defensive positions, I may in time make enough of them to make a laager only time will tell.

Thursday 10 February 2011

scratch build Boer wagon


scratch build Boer wagon, originally uploaded by MrTeld.

Today I have been busy making the first of the scratch built Ox wagons. It took a little longer to make than I expected and is a little on the rough side but I have learned a good bit in the making of this one that will help when It comes to making the next one. Hoping to be able to make a couple more over the weekend.

Wednesday 9 February 2011

A few Rorke's Drift Characters


Today I managed to take a few more pictures of some of the characters I have done so far for the Rorke's Drift game, although I do plan on using them  in a lot of different scenarios in the future under diferent names.


Hospital defenders 
Privates Horrigan, John Williams, Joseph Williams
and Private Hook in shirt sleeve order.


Commissariat and Transport Dept.
Acting Commissariat Walter Dunne, Assistant Acting Commissariat James Langley Dalton 
 
Acting Chaplain to the Volunteers
Rev. George Smith


Natal Mounted Police
Troopers Green, Lugg and Hunter. 
plus a Sergeant who will be used in other scenarios


Commissariat and Transport Dept.
Acting Store Keeper, Louis Byrne.
and Pip the dog


Hospital Corps
Corporal Rowland Miller, Second-Corporal Michael McMahon and Private Thomas Luddington.
 Complete with two patients on stretchers one who is past helping.
plus a wounded Private Frederick Hitch of the 24th foot receiving treatment


The first of the bedridden wounded which I am quite pleased with, I may well have a go at making a mould of the next one I do, as there are varying accounts as to the number of bedridden patients in the hospital at the time of the attack.One account puts the amount as high as eleven another as low as three. Given the different figures given I will have a go at casting a dozen, I’m sure I can find a use for any I don’t use in this game.